


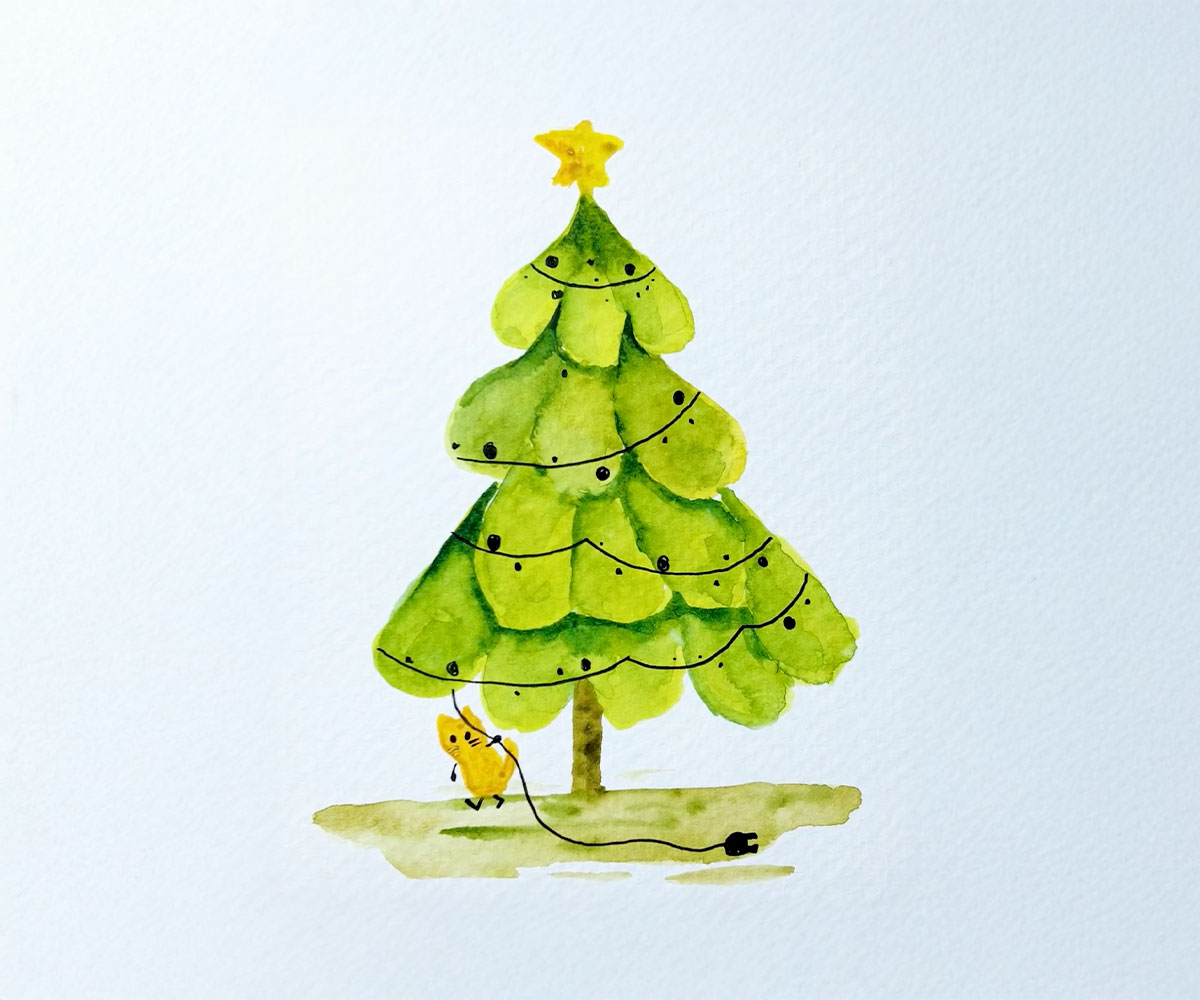
27 Oct Easy Watercolor Christmas Tree: A Cute 5-Minute Postcard for Beginners
All you need is 5 minutes, three layers of color and a fine liner pen to paint an easy watercolor Christmas tree that’s cute enough to send as a holiday postcard, even if you’ve never held a watercolor brush before.
There’s no sketching required: you paint straight onto the paper. And the part that makes this painting so adorable? A tiny yellow cat dragging the string lights off to find a plug, as if the tree is just about to light up.
Level: Level 1 – First Strokes · Time: 5 minutes of painting (+ drying time) · Colors: 4 · Paper size: Postcard (about 8.5×11 in)
This painting is done directly in color, with no pencil lines. If you’d like some “rails” to follow the first time, download the sketch for this easy watercolor Christmas tree below. It comes in one size, US Letter (4×6 in), big enough to print and shrink down to any postcard size you like.
*Personal use only.*
Supplies I Used
1. BAOHONG Academy watercolor paper, cold press, 300gsm (140lb), 100% cotton.
Cold press isn’t as bumpy as rough paper, yet it keeps more texture than hot press, which is perfect for the soft, blooming color in this tree. It’s thick enough that it barely buckles, even with several layers. I cut it down for postcards. [LINK: amazon.com/dp/B08T9XYRC2]
2. Watercolor brush set.
I only used two brushes here: a size 16 to lay down the base layer quickly and a size 10 for the dark green in the smaller spots. [LINK: amazon.com/dp/B0F5WBN7K9]
3. HIMI watercolor set.
A beginner-friendly set: bright colors that reactivate quickly with water, at a price that lets you practice freely. [LINK: HIMI set – to add]
4. Black fine liner pen.
For the string lights, the bulbs and the cat’s face, once the paint is dry. [LINK: to add]
Ready to upgrade? Daniel Smith Extra Fine Essentials (six artist-grade tubes that can mix almost any color) · Winsor & Newton Professional Watercolour (a half-pan set in a light metal tin). Artist-grade paints carry more pigment, so colors go on richer and stay clean when you mix them. [LINK: to add]
Just starting out with nothing yet? [LINK: The Only 5 Supplies You Need to Start Watercolor] lists exactly what to buy first. Torn between beginner and artist-grade paints? [LINK: Best Watercolor Sets for Beginners: Student vs Artist Grade] compares them side by side.
Colors in This Painting
Green with a touch of yellow → base layer for the whole tree · very watery
Dark green → shadows and depth so the tree doesn’t look flat · about 1 part paint to 1 part water
Watery green + a touch of brown → trunk and ground · light
Yellow → the star and the cat · medium, not too watery
The Secret: Wet-on-Dry Layering
This easy watercolor Christmas tree is just three layers of color, and each new layer only goes on once the one below is completely dry: layer 1 is the base color, layer 2 adds depth and layer 3 adds the details. Because you’re painting on a dry surface, the dark green keeps crisp edges instead of bleeding, so your tree looks full and rounded even when you paint fast.
Curious why waiting for it to dry matters so much? [LINK: Layering (Glazing) in Watercolor for Beginners] includes a three-layer exercise so you can practice this one skill on its own.
How to Paint an Easy Watercolor Christmas Tree in 4 Steps
Step 1 – Paint the Yellow-Green Base Layer
Mix green with a little yellow and add plenty of water to keep it very light. With the size 16 brush, paint from the top down to build four tiers. The bottom edge of each tier is a row of rounded scallops, like petals. Don’t worry about filling every gap: the tiny white spots left behind make the tree look fresh and full of light.
This layer only sets the shape of your tree, so the lighter it is, the easier it is to adjust later.
Step 2 – Add the Trunk and the Ground
Mix a watery green with a touch of brown. Paint a short vertical stroke under the last tier for the trunk, then a thin horizontal sweep for the ground. Now let the whole base layer dry completely: the paper loses its shine and no longer feels cool when you touch it with the back of your hand.
Step 3 – Add Dark Green for Depth (the Most Important Step)
Mix a dark green at about 1 part paint to 1 part water. With the size 10 brush, paint over the base layer only where the shadows fall: right under the edge of the tier above and in the gaps between the scallops. Go slowly and don’t overthink it. Those patches of light and dark are what make an easy watercolor Christmas tree look plump instead of flat.
⚠️ The most important tip: let layer 1 dry completely before you start layer 2. If the base is still wet, the dark green will spread and turn the colors muddy, and the tree loses its glow and its shape.
Step 4 – Details: the Star, the Lights and the Cat
Paint the star on top and a little cat at the base in yellow. Once the paint is dry, use the black fine liner to draw strings of lights draped around each tier, then dot round bulbs along each strand. Finally, run one cord from the tree down to the cat’s paws, add a tiny plug at the end and give the cat a face. That’s it: your easy watercolor Christmas tree is ready to mail!
Want the full step-by-step video? Subscribe to my Facebook Page and get 2 new full tutorials every week, posted Tuesday and Thursday mornings (US time). Watch them as many times as you like. These lessons are exclusive to subscribers, all for less than the price of a coffee a month.
Proud of Your Painting?
I’d love to see your painting! Share a photo of your lovely watercolor postcard in my watercolor community on Facebook, and join the conversation with hundreds of fellow painters.
FAQs
Gently dab the area with a dry paper towel to lift some paint, let the paper dry completely, then add the dark green again. It usually happens when layer 2 goes on while the base is still wet, so next time just wait a little longer.
Because the paint underneath was still damp. Wait a few more minutes until the painting is completely dry, then draw the lights and dot the bulbs with your fine liner.
Because if the base is still wet, the dark green spreads and turns the colors muddy and flat. Once the paper has lost its shine and no longer feels cool to the touch, you’re ready for the next layer.
No. This easy watercolor Christmas tree is built from simple rounded scallops, so you can paint it freehand. If you’re not confident yet, print the free US Letter sketch and scale it to the postcard size you want.
Use 300gsm (140lb) cold press watercolor paper cut to A6 or 4×6 inch. It’s thick enough not to buckle under several layers and sturdy enough for a postcard. If you’re mailing it, slip it into an envelope so the paint can’t get wet.



No Comments